
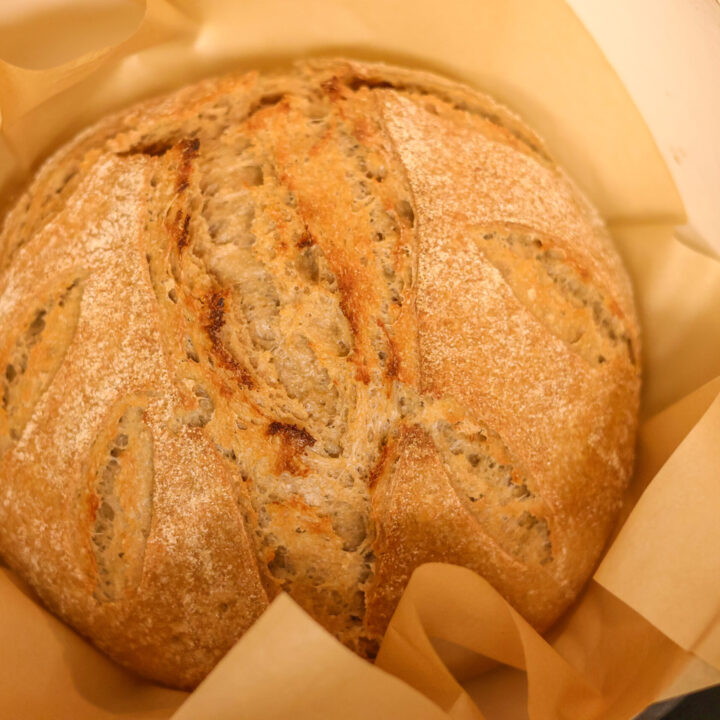
Artisan Sourdough Bread with 100% Fresh Milled Flour
Learn how to make a traditional artisan loaf of sourdough bread using fresh milled flour! This simple and easy whole wheat sourdough recipe will quickly become a staple in your kitchen.
As an amazon associate I earn from qualifying purchases at no increased cost to you.

If you have been in the sourdough world for any amount of time; and tried to convert your favorite recipe with freshly milled flour, chances are that you were sorely disappointed with your first attempt. My tried and true recipe, normally fluffy and delicious, turned into a dense, flat, brick of brown bread when I substituted my freshly milled flour for the all purpose white flour I was used to using.
Because of these less than desirable results I abandoned sourdough for a few months and started using yeast packets. Once I learned how the whole wheat flour behaves during baking I attempted sourdough once again- and haven't turned back since!
Sourdough baking doesn't have to be intimidating or stressful. It becomes a natural flow in the kitchen as you learn it and become acquainted with your starter. Because sourdough bread has a nice slow rise time it yields even better results than traditional instant yeast with freshly milled flour! Giving the dough time to develop the gluten because it rises slowly; it gives you a chewy and deliciously sour result! Whole wheat sourdough bread is delicious and nutritious when you learn just a few simple tricks.


Ingredients
Water
Salt
Active Sourdough Starter- recently fed, bubbly and active starter is a key to success for bread that rises! For more info on sourdough starter read here.
Fresh milled whole grain flour- I use hard white wheat berries for everything sourdough. I find that it compliments the sour flavor better than hard red wheat. Soft wheat doesn't have enough gluten content to make good rising breads.
Vital Wheat Gluten- When baking with freshly milled flour, the bran and the germ "get in the way" of the gluten bonds forming. This makes the bread more dense and less airy. I have found that adding gluten allows me to mimic the texture if I was adding some all purpose flour in with the freshly milled flour. The added gluten creates stronger bonds in the dough. This gives you more desirable results without the downside of all purpose flour.

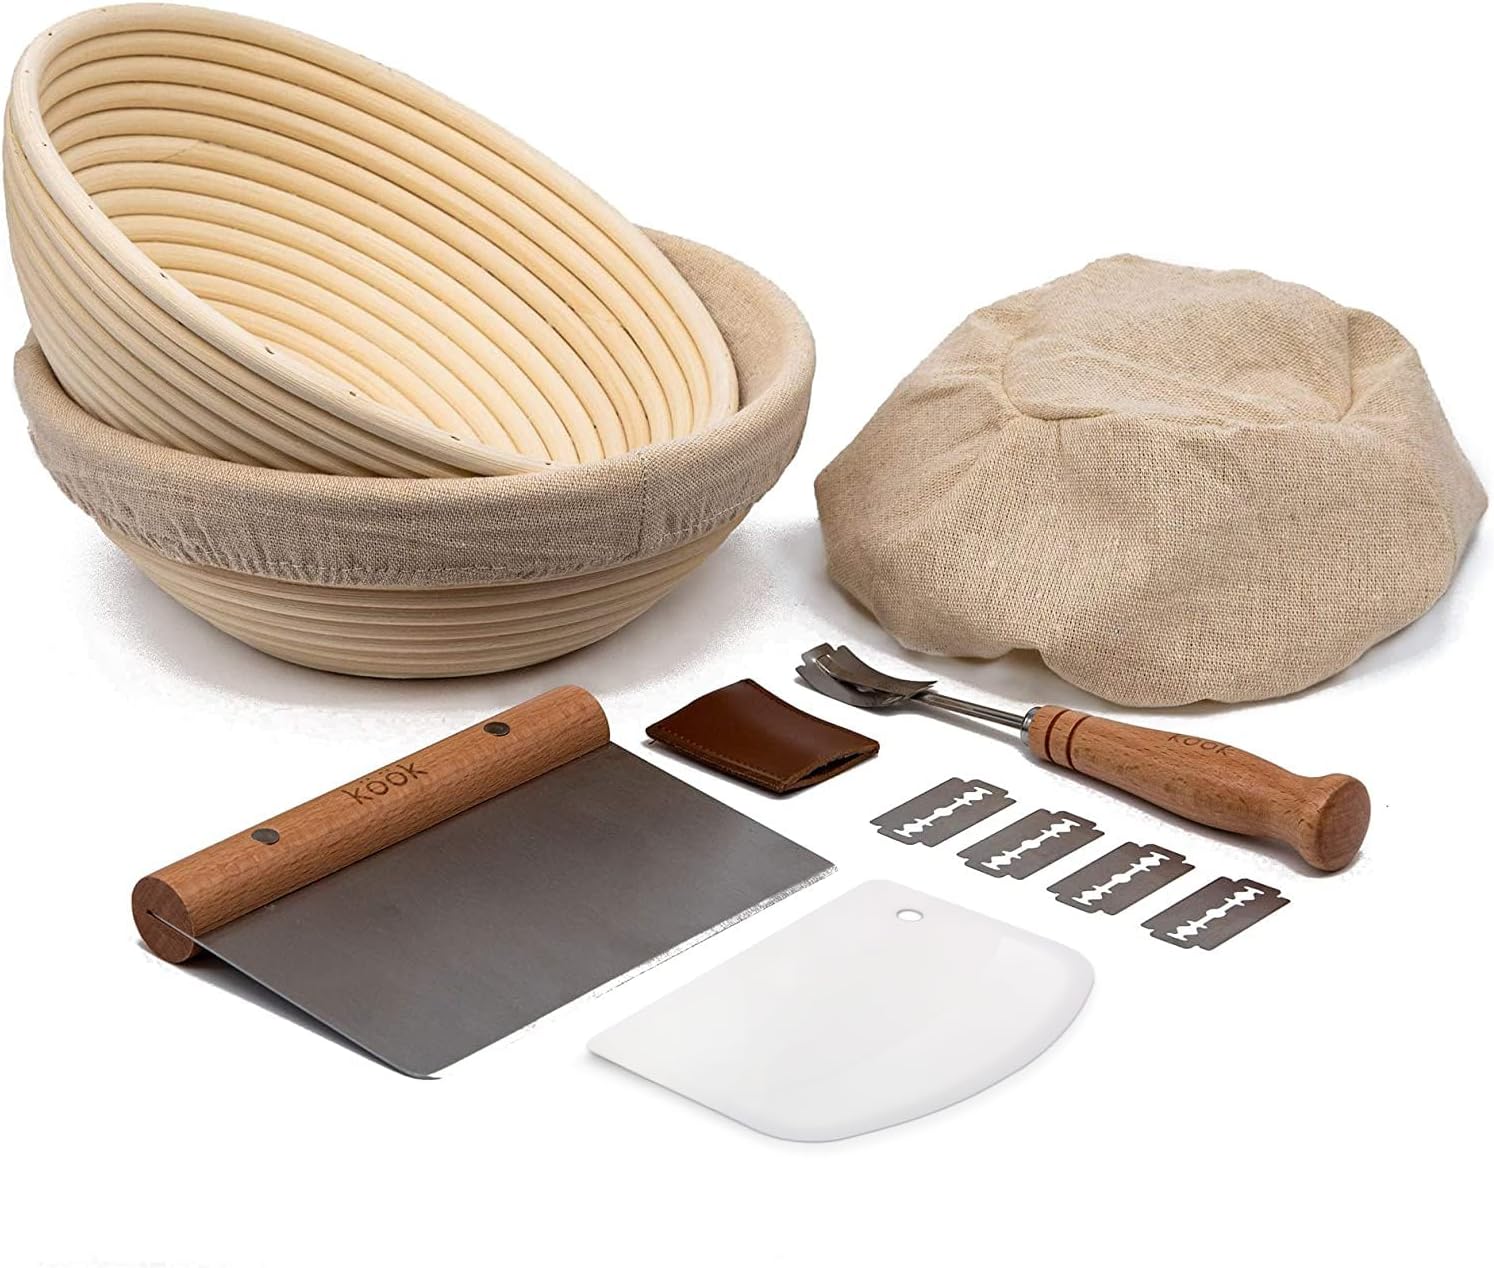
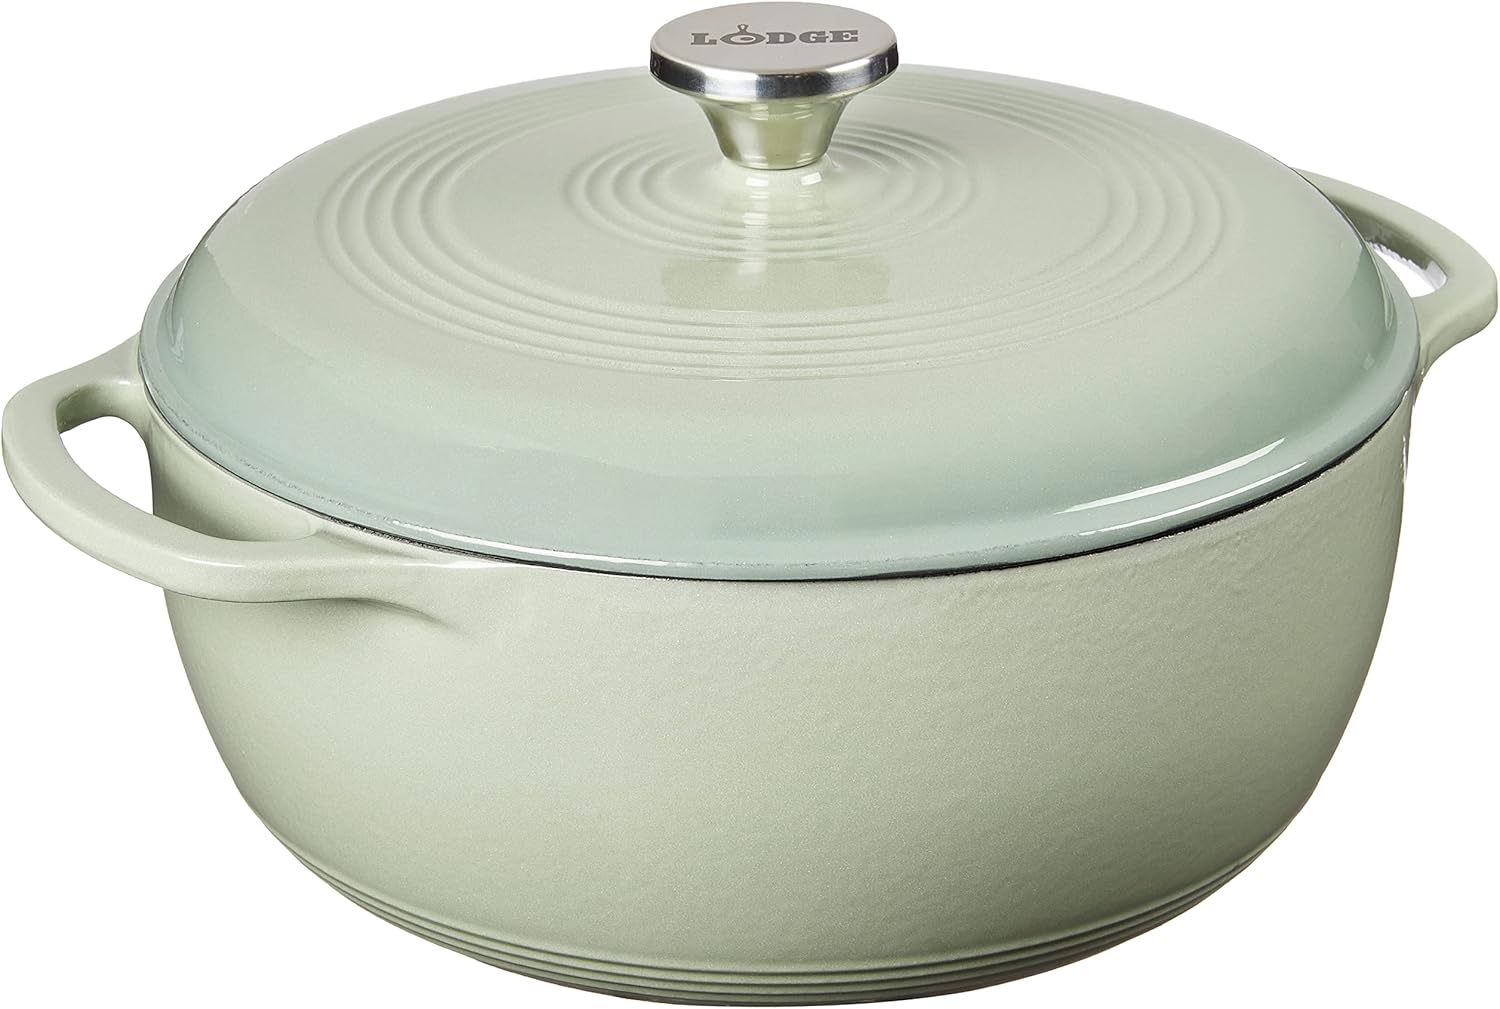
Tools To Help You Make This Recipe:
- Kook sourdough starter set
- Grain Mill ( I have the Mockmill Lino Pro 200 but there are many great options out there!)
- Kitchen scale
- Large Bowl
- Tea Towel, plastic wrap, or bowl cover
- Dough whisk
- Dutch oven
- Parchment paper
100% Freshly Milled Sourdough Artisan Loaf
Simple and easy recipe for a delicious artisan loaf of sourdough bread using 100% freshly milled flour.
Ingredients
- 100 grams bubbly active sourdough starter
- 850 grams water
- 1000 grams hard white wheat berries
- 50 grams vital wheat gluten
- 22 grams salt
Instructions
Make Dough
- Feed sourdough starter ~8 hours before making bread dough (How to feed sourdough starter)
- In a large bowl, combine active starter and water; stir.
- Add freshly milled hard white wheat and vital wheat gluten to starter/water combination.
- Use a danish dough whisk or your hands to combine all ingredients EXCEPT salt until dough is shaggy and all dry parts of flour are wet.
- Cover with a towel and allow to rest (autolyse) for 30-60 minutes. This process allows the flour to absorb the water and becomes fully hydrated
- Add salt to dough and combine with hands. I use stretch and fold method to do this.
- Cover with towel and allow to rest for 30-60 minutes.
- Stretch and fold dough. Use your hand to grab a large handful of the dough, stretch it up in the air, and fold it over on to itself. Give the bowl a quarter turn, and repeat all the way around.
- Repeat stretch and folds every 30-60 minutes for 3-4 cycles.
- Cover with a towel or plastic wrap and allow to bulk ferment until doubled, usually about 8-12 hours depending on temperature of the room
Divide and Shape
- Lightly flour your work surface and turn dough out onto counter.
- Using a bench scraper divide dough into two equal portions.
- Shape your loaves by pulling edges of dough into the center to create a round shape, and flip dough over.
- Pull and spin dough in your hands to create tension while forming a round loaf, this will help it to get nice and puffy in the oven.
- Line banneton baskets with covers or tea towels, flour lightly to prevent dough from sticking.
- Turn shaped loaves into banneton baskets upside down, pinch dough together, creating a seam that will be the bottom of your loaf.
- For a long ferment, this is when I place my loaves into the fridge (can refrigerate for a few hours, or up to 2 days). Refrigerating also makes it easier to score bread before baking.
- If skipping the long ferment, you can allow loaves to proof on the counter while you preheat the dutch ovens.
Bake
- Put dutch ovens in the oven, and preheat to 450 degrees.
- Once oven is preheated, remove dough from refrigerator (if applicable) and turn out onto parchment paper.
- Lightly flour top of loaf if desired, can make scoring pattern stand out more (this is totally optional).
- Score top of bread with desired pattern.
- Gently hold sides of parchment paper to place loaves into preheated dutch ovens.
- Bake with lid on for 35 minutes, and lid off for 5-10 minutes (depending on desired level of browned crispy crust).
- Allow to cool for at least 1 hour before cutting, and enjoy!
Notes
- I use hard white wheat berries for anything sourdough, I find that hard red wheat is too nutty and doesn't compliment the sour flavor well. Soft wheat doesn't have enough gluten structure for good yeast breads.
- When baking with freshly milled flour, the bran and the germ "get in the way" of the gluten bonds forming; this makes the bread more dense and less airy. I have found that adding gluten allows me to mimic the texture that would be similar if I was using some all purpose flour with the freshly milled flour. The added gluten creates stronger bonds in the dough, giving you more desireable results without the downside of all purpose flour.
- Baking tip- add a handful of rice to the dutch oven (before placing parchment paper in) this prevents the bottom of the loaf from burning and getting too hard and crispy.
- You may need to adjust lid off baking time depending on your oven; if I take the lid off sooner my bread gets too browned. You want a total bake time of about 40-45 minutes; for me 35 minutes lid on and 5-7 lid off has been the sweet spot.
Recommended Products
As an Amazon Associate and member of other affiliate programs, I earn from qualifying purchases.


Nutrition Information:
Yield: 24 Serving Size: 1 SliceAmount Per Serving: Calories: 57Total Fat: 0gSaturated Fat: 0gUnsaturated Fat: 0gSodium: 380mgCarbohydrates: 10gFiber: 1gSugar: 0gProtein: 4g
Step By Step Instructions
Feed Starter
Feed sourdough starter about 6-8 hours before you want to make dough. For more info on feeding your starter and my typical bakers schedule click here. Watch me feed my sourdough starter with freshly milled flour and give some tips in this video.
Make Dough
In a large bowl, combine active starter and water; stir with dough whisk.


Add freshly milled hard white wheat and gluten to the water/starter combination. Use dough whisk or your hands to thoroughly combine until you have a shaggy dough.


Cover with a tea towel, bowl cover, or plastic wrap and allow dough to rest (autolyse) for 30-60 minutes.
Add salt to shaggy dough with your hands, I use the stretch and fold method to do this. Cover, and allow to rest for 30-60 minutes.

Stretch and fold dough every 30-60 minutes for a total of 2-4 repetitions.


Cover, and allow to 8-12 hours for bulk fermentation (this timing varies depending on the temperature of your kitchen- you want the dough to double in size during this time).

Divide and Shape
Lightly flour your work surface. I keep any left over flour I have in the freezer and use it for things like this. Turn dough out onto floured surface.


Divide into two equal portions using a bench scraper.
Shape your loaves by pulling edges of the dough into the center to create and round shape.


Flip the loaf over and pull it against the counter while spinning your hands to create tension in the dough. This will give your loaf a good oven spring while baking.


Lightly flour lined banneton baskets and flip loaves upside down for proofing. Pinch together edges of the dough to create a seam, this will be the bottom of your loaves.


If a long ferment is your desire; place banneton baskets in the refrigerator. (I usually put mine in a plastic bag to avoid drying out dough while long fermenting.) Allow to long ferment for up to 3-4 days; be aware that this will increase the sour flavor of your dough.
Second Rise
If not performing a long ferment; place banneton baskets near oven to proof while you preheat dutch ovens for baking.


Bake
Place dutch ovens in cold oven; set temperature to 450 degrees and allow oven to preheat with dutch ovens inside. A good hot dutch oven is key to oven spring and a good rise!
When dutch ovens are preheated; remove from oven and open lids.
Pro tip: drop a thin layer of rice in the bottom of your dutch oven to prevent your loaves from getting to hard and crispy!

Put a piece of parchment paper on the counter. Flip loaves out of banneton baskets and on to parchment paper.
Dust lightly with flour if desired; use a sharp knife or razor blade to create scoring pattern.
Carefully pick up parchment paper by the corners and lower bread down into dutch oven, use oven mitt to put lids on.


Bake covered at 450 degrees for 35 minutes; remove lid and continue baking for 5-7 minutes. Bake time with lid on and off can vary depending on your oven; I have found that 35 minutes lid on and 5-7 lid off works perfectly for a fluffy bread and crispy crust. If you find that your loaves aren't getting crispy enough for you during that time; you can shorten lid on time and lengthen lid off time.
Remove bread from dutch ovens and allow to cool for at least 60 minutes before slicing for best results, and enjoy!


Tips for Success
- I use a hard white wheat berry for anything sourdough, I find that hard red wheat is too nutty and doesn't compliment the sour flavor well. Soft wheat doesn't have enough gluten structure for good yeast breads.
- When baking with fresh flour, the bran and the germ "get in the way" of the gluten bonds forming; this makes the bread more dense and less airy. Adding gluten and using a sourdough approach rather than traditional yeast helps give the gluten time to really develop and yields and wonderful result!
- When doing stretch and folds; wet your hands to prevent the dough from sticking to you.
- Baking tip- add a handful of rice to the dutch oven (before placing parchment paper in) this prevents the bottom of the loaf from burning and getting too hard and crispy. You may need to adjust lid off baking time depending on your oven; if I take the lid off sooner my bread gets too browned. You want a total bake time of about 40-45 minutes; for me 35 minutes lid on and 5-7 lid off has been the sweet spot.
")